- /
- /
- /
Configuring IPsec IKEv2 Remote Access VPN Clients on Android
Note: Android considers using a VPN an action that must be secure. When activating any VPN option the OS will force the user to add some form of locking to the device if one is not already present. It doesn’t matter which type of lock is chosen (PIN lock, Pattern lock, Password, etc) but it will not allow a VPN to be configured until a secure lock has been added. On Android devices with Face lock, that is not available as a secure lock type.
Before starting, install the strongSwan app from the Play Store:
Setup the VPN Connection
- Copy the CA Certificate to the device
- Open the strongSwan app
- Import the CA:
- Tap the settings icon (Three vertical dots in the upper right)
- Tap CA Certificates
- Tap the settings icon (Three vertical dots in the upper right)
- Tap Import Certificate
- Locate the CA Certificate copied earlier and tap it.
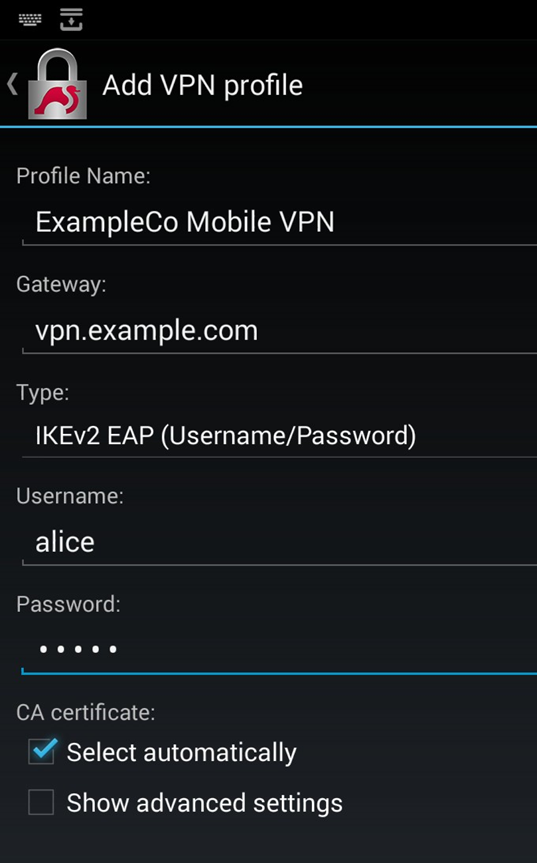
- Tap Add VPN Profile
- Enter a Profile Name (optional, if left blank, the gateway address will be used)
- Enter the address of the firewall as the Gateway (e.g. vpn.example.com)
- Select IKEv2 EAP (Username/Password) for the Type
- Enter the Username
- Enter the Password to have it be remembered or leave it blank to prompt for the password on each connection.
- Check Select automatically under CA Certificate
- Compare the settings to Figure Android strongSwan Client Settings
Connecting and Disconnecting
To Connect:
- Open the strongSwan app
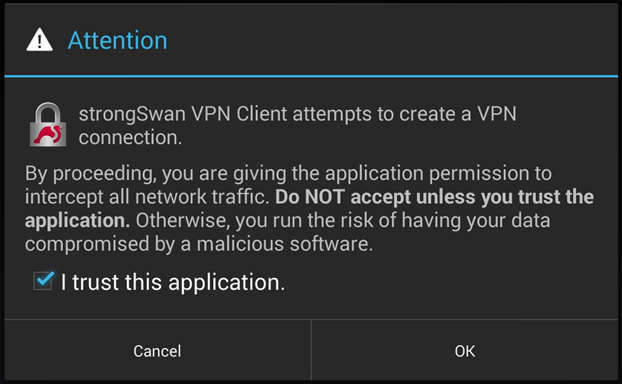
- Tap the desired VPN
- Check I trust this application at the security prompt as shown in Android strongSwan Client Settings
- Tap OK
To Disconnect:
- Swipe down from the top notification bar
- Tap the strongSwan entry in the notification list
- Tap Disconnect
Alternately:
- Open the strongSwan app
- Tap Disconnect on the desired VPN