- /
- /
- /
Configuring IPsec IKEv2 Remote Access VPN Clients on Windows
Windows 8 and newer easily support IKEv2 VPNs, and Windows 7 can as well though the processes are slightly different. The procedure in this section was performed on Windows 10, but Windows 8 is nearly identical. The procedure to import certificates to Windows 7 can be found on the strongSwan Wiki
Import the CA to the Client PC
- Export the CA Certificate from AZTCO-FWand download or copy it to the client PC:
- Navigate to System > Cert Manager, Certificate Authorities tab on AZTCO-FW
- Click
by the CA to download only the certificate
- Locate the downloaded file on the client PC (e.g. VPNCA.crt) as seen in Figure Downloaded CA Certificate
- Double click the CA file
- Click Install Certificate. . . as shown in Certificate Properties
- Select Local Machine as shown in Certificate Import Wizard – Store Location
- Click Next
- Click Yes at the UAC prompt if it appears

- Select Place all Certificates in the following store as shown in Figure Certificate Import Wizard – Browse for the Store
- Click Browse
- Click Trusted Root Certification Authorities as shown in Figure Select Certificate Store
- Click Next
- Review the details, they should match those in Figure Completing the Certificate Import Wizard
- Click Finish
- Click OK
- Click OK
Setup the VPN Connection
Once the certificate has been properly imported it is time to create the client VPN connection. The exact steps will vary depending on the version of Windows being used by the client, but will be close to the following procedure.
- Open Network and Sharing Center on the client PC
• Click Set up a new connection or network
- Select Connect to a workplace
- Click Next
- Select No, create a new connection
- Click Next
- Click Use my Internet Connection (VPN)
Enter the IP address or hostname of the server into the Internet address field as shown in Figure Windows IKEv2 VPN Connection Setup Screen


Note: This must match what is in the server certificate Common Name or a configured Subject Alternative Name!
- Enter a Destination Name to identify the connection
- Click Create
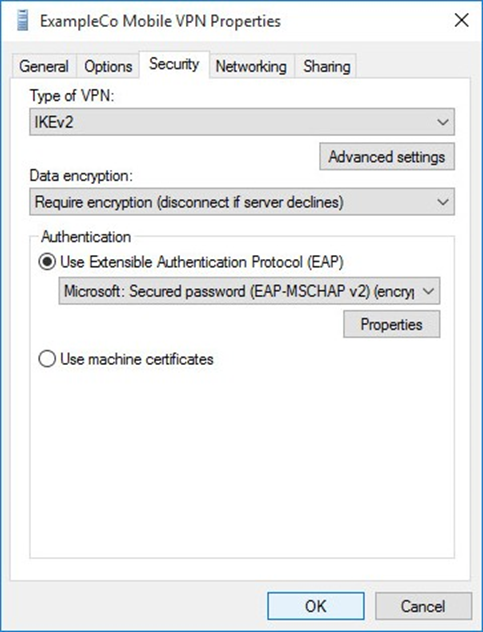
The connection has been added but with several undesirable defaults. For example the type defaults to automatic. A few settings need to be set by hand first to ensure a proper connection is made. Refer to Figure Windows IKEv2 VPN Connection Properties
- In Network Connections / Adapter Settings in Windows, find the connection created above
- Right click the connection
- Click Properties
- Click the Security tab
- Set Type of VPN to IKEv2
- Set Data Encryption to Require Encryption (disconnect if server declines)
- Set Authentication / Use Extensible Authentication Protocol to Microsoft: Secured password (EAP-MSCHAP v2) (encryption enabled)
- Compare the values on the screen to those in Figure Windows IKEv2 VPN Connection Properties
- Click OK
The connection is now ready to use.


Disable EKU Check
When the CA and server certificates are made properly on AZTCO-FW 2.2.4 and later, this is not necessary. If an improp- erly generated server certificate must be used for some reason, then the Extended Key Usage check may need to be disabled on Windows. Disabling this check also disables validation of the certificate’s common name and SAN fields, so it is potentially dangerous. Any certificate from the same CA could be used for the server when this is disabled, so proceed with caution.
To disable the extended key usage checks, open up Registry Editor on the Windows client and navigate to the follow- ing location in the client registry:
| HKEY_LOCAL_MACHINE\SYSTEM\CurrentControlSet\services\RasMan\Parameters\ |
In there, add a new DWORD entry named DisableIKENameEkuCheck and set it to 1. A reboot may be required to activate the setting.
Advanced Windows IPsec settings
With Windows 10 PowerShell cmdlet Set-NetIPsecMainModeCryptoSet it is possible to change various ad- vanced settings, like IPsec lifetime:
| PS C:\>Set-NetIPsecMainModeCryptoSet -DisplayGroup “AZTCO-FW IPsec” -MaxMinutes 600 |
This example modifies the maximum IPsec SA lifetime for the “AZTCO-FW IPsec” connection. The default Windows IPsec lifetime is 4800 minutes (eight hours).